%%capture
%matplotlib inline
!pip install kornia
!pip install kornia-rsSharpen image using unsharp mask
Basic
Filters
kornia.filters
In this tutorial we are going to learn how to use the unsharp mask
![]()
We first install kornia
import kornia
import matplotlib.pyplot as plt

kornia.__version__'0.6.12'Downloading the example image.
import io

import requests


def download_image(url: str, filename: str = "") -> str:
    filename = url.split("/")[-1] if len(filename) == 0 else filename
    # Download
    bytesio = io.BytesIO(requests.get(url).content)
    # Save file
    with open(filename, "wb") as outfile:
        outfile.write(bytesio.getbuffer())

    return filename


url = "https://github.com/kornia/data/raw/main/squirrel.jpg"
download_image(url)'squirrel.jpg'# Read the image with Kornia
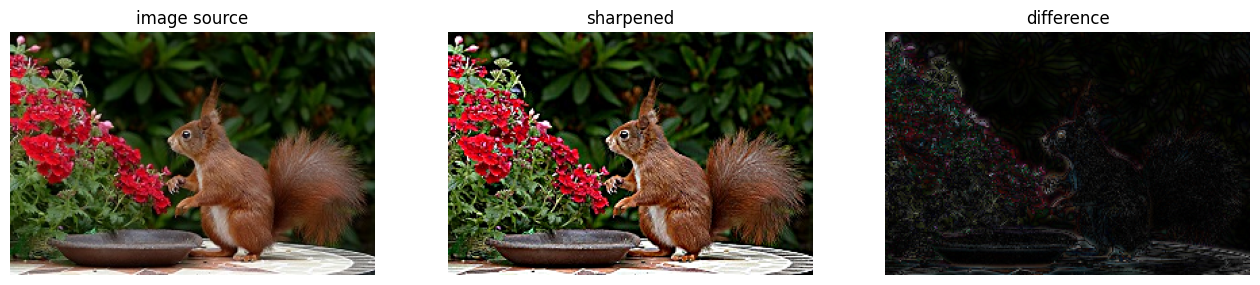
data = kornia.io.load_image("squirrel.jpg", kornia.io.ImageLoadType.RGB32)[None, ...] # BxCxHxWWe create Unsharp Mask filter object and apply it to data. The unsharp mask filter is initialized with the format kornia.filters.UnsharpMask(kernel_size, sigma). You can tune these parametres and experiment!
sharpen = kornia.filters.UnsharpMask((9, 9), (2.5, 2.5))
sharpened_tensor = sharpen(data)
difference = (sharpened_tensor - data).abs()
# Converting the sharpened tensor to image
sharpened_image = kornia.utils.tensor_to_image(sharpened_tensor)
difference_image = kornia.utils.tensor_to_image(difference)So, let us understand how we arrived till here.
- In the unsharp mask technique, first a gaussian blur is applied to the data.
- Then the blur is subtracted from the orignal data.
- The resultant is added to the origanl data.
- So, what do we get? Sharpened data!
# To display the input image, sharpened image and the difference image
fig, axs = plt.subplots(1, 3, figsize=(16, 10))
axs = axs.ravel()

axs[0].axis("off")
axs[0].set_title("image source")
axs[0].imshow(kornia.tensor_to_image(data))

axs[1].axis("off")
axs[1].set_title("sharpened")
axs[1].imshow(sharpened_image)

axs[2].axis("off")
axs[2].set_title("difference")
axs[2].imshow(difference_image)
plt.show()
Clipping input data to the valid range for imshow with RGB data ([0..1] for floats or [0..255] for integers).